Great brochure design ideas succeed or fail at the bindery folder before a prospect ever reads the copy. When a multi-panel layout ignores substrate caliper—splitting a sheet into three equal columns for a nested letter fold, running heavy dark ink across an uncreased 250 gsm spine, or ordering cross-grain cover stock—the finished piece telescopes at the fore-edge, cracks along the hinge, or springs open on the display rack.
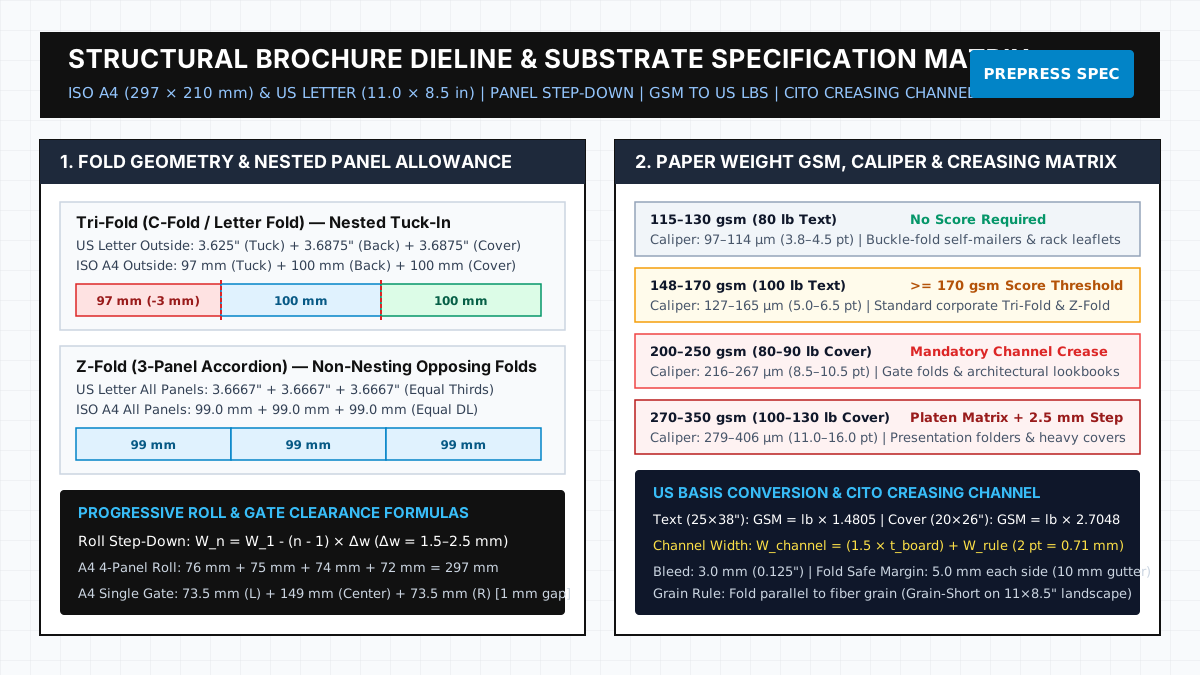
To engineer a brochure that folds flat and aligns across every panel, match your creative concept to the mechanical geometry of the fold and the caliper of the stock. Any fold where one panel tucks inside another—such as a Tri-Fold (3.625 + 3.6875 + 3.6875 in on US Letter; 97 + 100 + 100 mm on ISO A4), a 4-Panel Roll Fold, or a Gate Fold—requires progressive panel width reduction (1.5–3.0 mm or 1/16 in per nested fold) to accommodate paper thickness. Non-nesting accordion layouts like the Z-Fold divide into equal panels (3.6667 in or 99.0 mm each). Pair the dieline with the right brochure paper weight GSM: 115–130 gsm (80 lb Text) for high-volume self-mailers, 148–170 gsm (100 lb Text) for standard corporate tri-folds, and 200–300 gsm (80–110 lb Cover) with platen channel creasing (>= 170 gsm threshold) for flagship lookbooks.
| Fold Configuration | Panels (Pages) | Nesting Mechanics | US Letter (11.0 × 8.5 in) Panel Widths (Outside L → R) |
ISO A4 (297 × 210 mm) Panel Widths (Outside L → R) |
Best Brochure Design Application |
|---|---|---|---|---|---|
| Tri-Fold (Letter / C-Fold) | 6 panels (2 sides × 3) | Inner right flap tucks inside left front cover | 3.625 in (Tuck) + 3.6875 in (Back) + 3.6875 in (Front Cover) |
97 mm (Tuck) + 100 mm (Back) + 100 mm (Front Cover) |
Progressive 3-stage narrative reveal; service menus; corporate overviews |
| Z-Fold (3-Panel Accordion) | 6 panels (2 sides × 3) | Opposing parallel folds (Z profile); zero nesting |
3.6667 in + 3.6667 in + 3.6667 in (Three equal 3-2/3 in panels) |
99.0 mm + 99.0 mm + 99.0 mm (Three equal DL panels) |
Cross-panel panoramic infographics, timelines, maps, and perforated reply cards |
| 4-Panel Accordion Fold | 8 panels (2 sides × 4) | Three alternating parallel folds (M/W profile) |
2.75 in × 4 equal panels (or 3.50 in × 4 on 14 × 8.5 in Legal) |
74.25 mm × 4 equal panels (or 100 mm × 4 on 400 × 210 mm) |
Conference schedules, multi-tier pricing matrices, transit maps |
| 4-Panel Roll (Barrel) Fold | 8 panels (2 sides × 4) | Three inward folds rolling in one spiral direction | 2.8125 in (Cover) + 2.8125 in (Back) + 2.75 in (Nest 1) + 2.625 in (Nest 2) |
76 mm (Cover) + 75 mm (Back) + 74 mm (Nest 1) + 72 mm (Nest 2) |
Step-by-step onboarding tutorials, diagnostic flowcharts, luxury product stories |
| Single / Double Gate Fold | 6 or 8 panels | Two outer wings fold inward to meet at center axis | 2.71875 in (Left Wing) + 5.50 in (Center) + 2.71875 in (Right Wing); 1/16 in gap |
73.5 mm (Left Wing) + 149 mm (Center) + 73.5 mm (Right Wing); 1.0 mm gap |
Dramatic flagship product launches, architectural/automotive centerfolds |
Before building custom fold guides, confirm which layout application your production team and commercial printer will maintain using our brochure design software and quote comparison guide.
How Fold Geometry Shapes Brochure Design Ideas & Visual Pacing
Strong brochure design ideas treat the physical fold crease as a page-turning mechanism that controls what the reader sees at each stage of opening. Instead of pouring text across arbitrary columns, structure your print advertising layout hierarchy around the reveal sequence of your chosen fold:
- Progressive 3-Stage Storytelling (Tri-Fold / Letter Fold): When a reader picks up a closed
99 × 210 mm(DL) or3.6875 × 8.5 intri-fold brochure, only the Front Cover is visible. Lifting the front cover creates a second self-contained composition: the Inside Left panel paired side-by-side with the Outside Tuck-In Flap. High-converting B2B brochures use this intermediate state to present a core value proposition or problem-solution pair before the reader unfolds the right-hand flap to reveal the full three-panel interior spread. - Continuous Panoramic Canvases & Tear-Off Cards (Z-Fold / Accordion): Because a Z-fold opens outward in one fluid accordion motion without a tucked flap blocking the view, all three interior panels (
297 × 210 mmor11.0 × 8.5 in) appear simultaneously. This geometry suits architectural elevations, six-step process timelines, wide data comparison tables, and trade-show registration mailers where the third panel is perforated as a detachable business-reply or appointment card. Detaching one outer panel on a Z-fold leaves a clean two-panel bifold intact. - Sequential Unrolling Walkthroughs (4-Panel Roll Fold): A barrel or roll fold forces the reader to unroll panels in a strict sequence from outer cover to innermost flap. Use this mechanical constraint for medical device instructions, museum gallery self-guides, or SaaS onboarding checklists where Step 1 must be read before Step 2 is physically exposed.
- Symmetrical Curtain Reveals (Single & Double Gate Fold): In a gate fold, the left and right wings act as theatrical doors that part down the vertical centerline to unveil an uninterrupted double-width center spread (
149 mmon A4 or5.50 inon US Letter). Keep the two outer gate wings visually restrained—using a split typographic lockup or an architectural detail that bridges the center seam—so opening the gates delivers maximum visual contrast on the interior hero photography.
Takeaway: Select the fold pattern first based on how the reader should uncover information—staged reveal (Tri-Fold), simultaneous panorama or tear-off card (Z-Fold), sequential unrolling (Roll Fold), or theatrical centerfold (Gate Fold)—and lock the dieline before placing artwork.
Tri-Fold vs Z-Fold Brochure: Panel Width Math & Dieline Setup
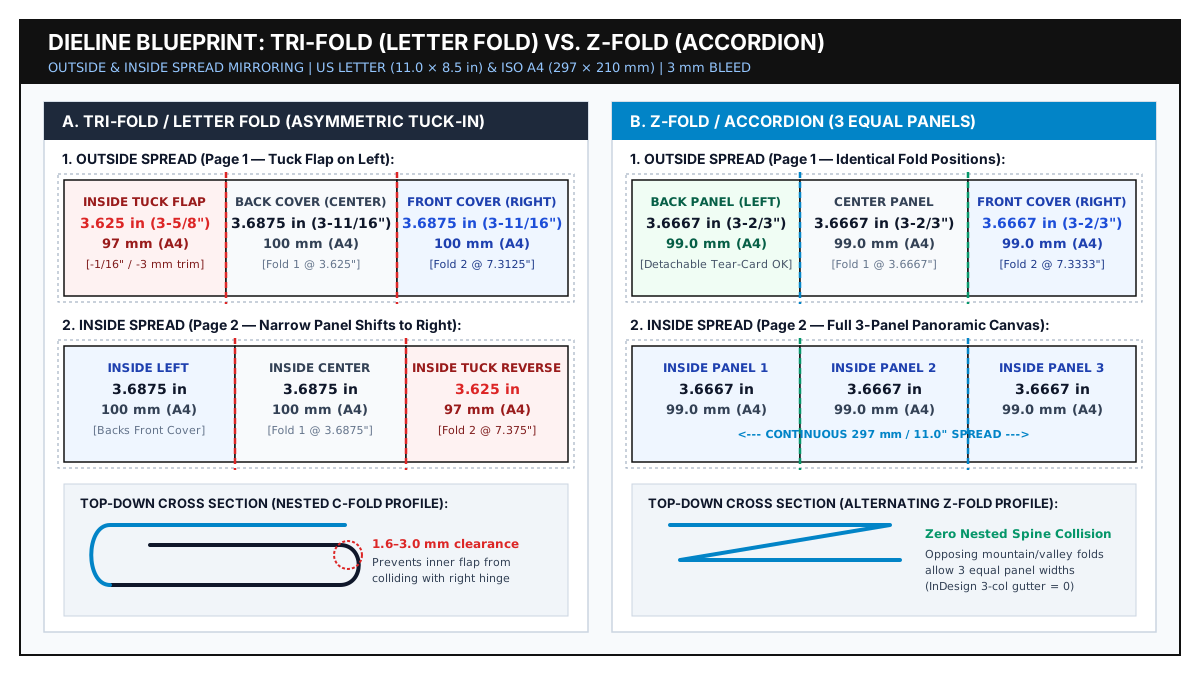
The most frequent prepress rejection in commercial brochure printing happens when a designer sets up a tri fold vs z fold brochure using identical column widths. In Adobe InDesign or Illustrator, creating a 3-column grid with 0 mm gutter divides an 11.0 in US Letter sheet into three 3.6667 in (93.13 mm) panels and an ISO A4 297 mm sheet into three 99.0 mm panels. That equal-third grid works for a Z-Fold, where the two parallel creases fold in alternating directions (Z profile) and neither outer panel wraps inside a closed spine.
In a Tri-Fold (Letter Fold / C-Fold), both creases fold inward toward the center: the right panel folds over the center panel first, and the left panel folds over the right panel as the front cover. Because the tucked right panel sits inside the curved hinge of the left fold, the paper’s caliper (t) takes up physical space inside the bend. If all three panels measure 99.0 mm (3.6667 in), the outer edge of the tucked panel slams into the inside of the left crease, forcing the brochure to bow upward, crease off-register, or telescope past the fore-edge.
Why Outside and Inside Spreads Mirror Left-to-Right
When a flat sheet is printed duplex (two-sided), the panel that sits on the far left of Page 1 (the Outside spread) becomes the far right panel when the sheet is flipped horizontally to view Page 2 (the Inside spread). Failing to mirror the fold guides between Page 1 and Page 2 shifts the interior fold scores by 1.6 mm (1/16 in) on US Letter or 3.0 mm on ISO A4, causing background fills and panel borders to wrap around the spine onto the wrong face.
Use these exact commercial prepress coordinates when building a two-page duplex tri-fold brochure template:
-
US Letter (
11.0 × 8.5 in/279.4 × 215.9 mmLandscape):- Finished Folded Size:
3.6875 × 8.5 in(3-11/16 × 8.5 in/93.66 × 215.9 mm). - Page 1 — Outside Spread (Left to Right):
- Left Panel (Inside Tuck-In Flap):
3.625 in(3-5/8 in/92.08 mm) — trimmed1/16 in(0.0625 in/1.59 mm) narrower than the outer panels. - Center Panel (Back Cover):
3.6875 in(3-11/16 in/93.66 mm). - Right Panel (Front Cover):
3.6875 in(3-11/16 in/93.66 mm). - Vertical Fold Score Positions (from left trim edge): Fold 1 at
3.625 in(92.08 mm); Fold 2 at3.625 + 3.6875 = 7.3125 in(185.74 mm).
- Left Panel (Inside Tuck-In Flap):
- Page 2 — Inside Spread (Left to Right):
- Left Panel (Inside Left — backs Front Cover):
3.6875 in(93.66 mm). - Center Panel (Inside Center — backs Back Cover):
3.6875 in(93.66 mm). - Right Panel (Inside Right — reverse of Tuck-In Flap):
3.625 in(92.08 mm). - Vertical Fold Score Positions (from left trim edge): Fold 1 at
3.6875 in(93.66 mm); Fold 2 at3.6875 + 3.6875 = 7.375 in(187.33 mm).
- Left Panel (Inside Left — backs Front Cover):
- Finished Folded Size:
-
ISO A4 (
297 × 210 mmLandscape → DL99 × 210 mmFinished):- Page 1 — Outside Spread (Left to Right):
- Left Panel (Inside Tuck-In Flap):
97.0 mm(or98.0 mmon98 + 100 + 99 mmlight-stock templates;97.0 mmprovides a full3.0 mmclearance for150–250 gsmstocks). - Center Panel (Back Cover):
100.0 mm. - Right Panel (Front Cover):
100.0 mm. - Vertical Fold Score Positions (from left trim edge): Fold 1 at
97.0 mm; Fold 2 at97.0 + 100.0 = 197.0 mm.
- Left Panel (Inside Tuck-In Flap):
- Page 2 — Inside Spread (Left to Right):
- Left Panel (Inside Left):
100.0 mm. - Center Panel (Inside Center):
100.0 mm. - Right Panel (Inside Right — reverse of Tuck-In Flap):
97.0 mm. - Vertical Fold Score Positions (from left trim edge): Fold 1 at
100.0 mm; Fold 2 at100.0 + 100.0 = 200.0 mm.
- Left Panel (Inside Left):
- Page 1 — Outside Spread (Left to Right):
Worked Example 1: Setting Exact InDesign Ruler & Safety Guides for an ISO A4 Tri-Fold
Suppose you are building an ISO A4 (297 × 210 mm) tri-fold brochure on 170 gsm silk art paper with a 3.0 mm outer bleed and a 5.0 mm safety margin on either side of every fold line (10.0 mm total visual gutter across each crease). Instead of using equal columns, set Columns = 1 in Layout → Margins and Columns (Margins = 5.0 mm on all four sides) and drag custom vertical ruler guides from the left trim origin (X = 0.0 mm):
- Page 1 (Outside Spread) Guide Coordinates:
- Fold Score 1:
X = 97.0 mm(with safe-margin guides atX = 92.0 mmandX = 102.0 mm). - Fold Score 2:
X = 197.0 mm(with safe-margin guides atX = 192.0 mmandX = 202.0 mm). - Usable Live Text Widths: Left Tuck Panel =
97.0 - 5.0 (left trim margin) - 5.0 (fold safe zone) = 87.0 mm; Center Back Cover =100.0 - 5.0 - 5.0 = 90.0 mm; Right Front Cover =100.0 - 5.0 - 5.0 = 90.0 mm.
- Fold Score 1:
- Page 2 (Inside Spread) Guide Coordinates:
- Fold Score 1:
X = 100.0 mm(with safe-margin guides atX = 95.0 mmandX = 105.0 mm). - Fold Score 2:
X = 200.0 mm(with safe-margin guides atX = 195.0 mmandX = 205.0 mm). - Usable Live Text Widths: Inside Left =
90.0 mm; Inside Center =90.0 mm; Inside Right (Tuck Reverse) =87.0 mm.
- Fold Score 1:
Before sending the batch to an office duplex unit or approving a digital press proof, print one unscaled test copy (Actual Size, Long-Edge vs. Short-Edge flip check) and fold it along the 97 mm / 197 mm scores using our trifold brochure back-to-back fold verification protocol.
Takeaway: Never use equal 3-column grids for a Tri-Fold; place asymmetric vertical guides (3.625 / 7.3125 in on Page 1 and 3.6875 / 7.375 in on Page 2 for US Letter; 97 / 197 mm on Page 1 and 100 / 200 mm on Page 2 for ISO A4) and reserve equal panels strictly for Z-Fold accordion layouts.
Multi-Panel Nesting: 4-Panel Roll Fold Step-Down & Gate Fold Clearance
When your brochure design requires eight panels (four panels per side) or a symmetrical double-door reveal, folding tolerances compound across every successive crease.
1. Progressive Step-Down in a 4-Panel Roll Fold (Barrel Fold)
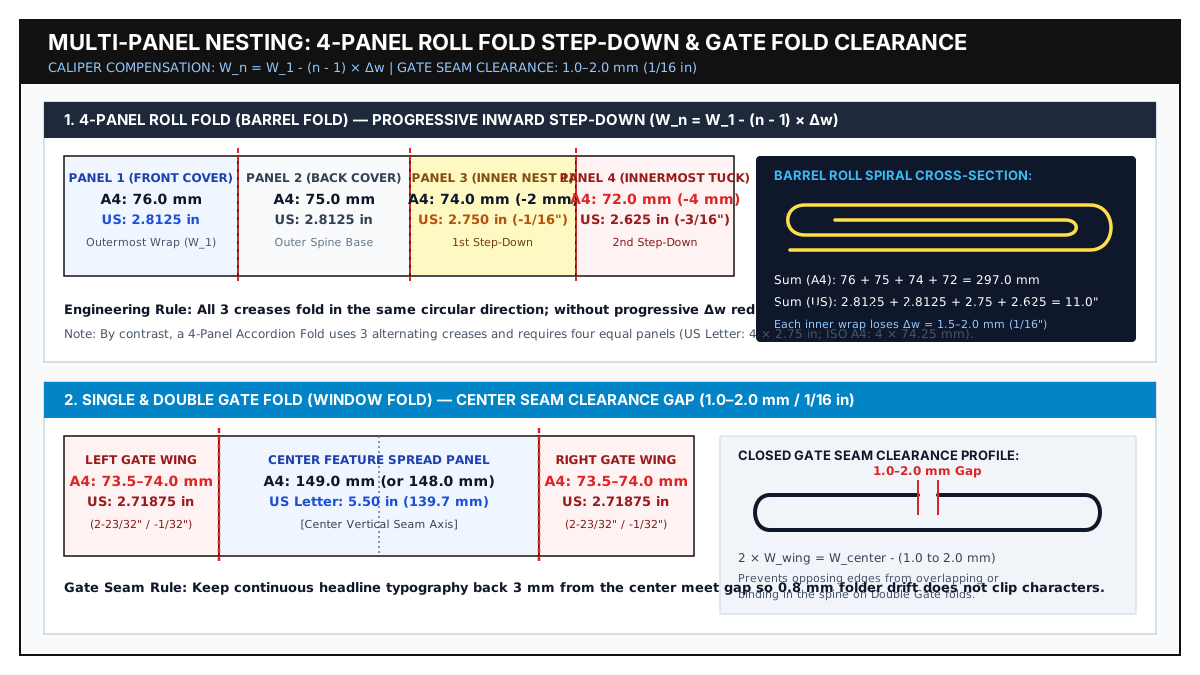
In a 4-Panel Roll Fold (also called an over-and-over or barrel fold), all three parallel creases roll inward in the same circular direction like a spiral. Panel 4 tucks inside Panel 3, and both Panel 4 and Panel 3 wrap inside the hinge between Panel 2 (Back Cover) and Panel 1 (Front Cover). Because each inner wrap encloses an additional layer of folded paper thickness, the panel widths must step down progressively from the outer cover to the innermost panel according to the linear reduction formula:
Wn = W1 − (n − 1) × Δw
Where:
W1is the full width of the outermost cover panel.nis the nesting index from outer panels (1, 2) to inner nested panels (3, 4).Δwis the per-fold step-down allowance, ranging from1.5 mm(1/16 in/0.0625 in) on130–150 gsmtext stock up to2.0–3.0 mm(3/32 into1/8 in) on170–250 gsmstock.
For standard flat sheets, commercial binderies specify these 4-panel roll-fold breakdowns:
- US Letter (
11.0 × 8.5 inFlat →2.8125 × 8.5 inFolded):- Outside Spread (Left to Right): Innermost Panel 4 =
2.625 in(2-5/8 in/66.68 mm) + Inner Nest Panel 3 =2.750 in(2-3/4 in/69.85 mm) + Outer Back Panel 2 =2.8125 in(2-13/16 in/71.44 mm) + Outer Front Cover Panel 1 =2.8125 in(2-13/16 in/71.44 mm). Total =2.625 + 2.750 + 2.8125 + 2.8125 = 11.000 in. - Inside Spread (Left to Right):
2.8125 in+2.8125 in+2.750 in+2.625 in.
- Outside Spread (Left to Right): Innermost Panel 4 =
- ISO A4 (
297 × 210 mmFlat →76 × 210 mmFolded):- Outside Spread (Left to Right): Innermost Panel 4 =
72.0 mm+ Inner Nest Panel 3 =74.0 mm+ Outer Back Panel 2 =75.0 mm+ Outer Front Cover Panel 1 =76.0 mm. Total =72 + 74 + 75 + 76 = 297.0 mm. - Inside Spread (Left to Right):
76.0 mm+75.0 mm+74.0 mm+72.0 mm.
- Outside Spread (Left to Right): Innermost Panel 4 =
If your 8-panel layout features a continuous timeline or four equal-width product columns where progressive narrowing (76 → 72 mm) would distort the visual grid, switch the bindery specification from a 4-Panel Roll Fold to a 4-Panel Accordion Fold (three alternating mountain/valley creases), which divides an A4 sheet into four identical 74.25 mm panels (or a US Letter sheet into four identical 2.75 in panels).
2. Single & Double Gate Fold Center Seam Clearance
In a Single Gate Fold (Window Fold), the left and right outer panels fold inward to meet at the vertical center axis without overlapping. If both outer gate wings are sized to exactly 50% of the center panel (74.25 + 148.5 + 74.25 mm on A4, or 2.75 + 5.50 + 2.75 in on US Letter), any slight buckle-folder drift (±0.8 mm) causes the two opposing paper edges to collide at the center seam and bow outward. In a Double Gate Fold—where the closed gate folds a second time down the center spine—equal wing widths bind directly inside the center crease and crush the inner edges.
To prevent edge collision and spine binding, size the two outer gate wings so their combined width is 1.0 to 2.0 mm (1/16 in) narrower than the center panel:
2 × Wwing = Wcenter − Gclearance
- ISO A4 Single Gate (
297 × 210 mmFlat): Set the Center Panel to149.0 mmand each Gate Wing to74.0 mm(74.0 + 149.0 + 74.0 = 297.0 mm, yielding a1.0 mmcenter clearance gap), or set the Center Panel to149.0 mmand each Gate Wing to73.5 mmon296 mmtrim (2.0 mmgap for heavy250 gsmstock). For a Double Gate Fold, step the outer wings down by2.0 to 3.0 mmeach so they clear the center spine hinge when folded closed. - US Letter Single Gate (
11.0 × 8.5 inFlat): Set the Center Panel to5.50 in(139.7 mm) and trim each outer Gate Wing by1/32 in(0.03125 in) to2.71875 in(2-23/32 in/69.06 mm), leaving a1/16 in(1.59 mm) center seam allowance.
Takeaway: Apply progressive reduction (Δw = 1.5–2.5 mm per inward roll) on Barrel Folds and leave a 1.0–2.0 mm (1/16 in) center meet gap between opposing wings on Gate Folds so multi-panel pieces lie completely flat.
Brochure Paper Weight GSM vs. US Basis Weight & Caliper Matrix
Specifying brochure paper weight gsm across international and North American print quotes often causes confusion because the metric system measures absolute mass per unit area (GSM, grams per square meter, g/m²), whereas the US Basis Weight system measures the weight in pounds (lbs) of one ream (500 sheets) cut to that paper category’s historical uncut parent sheet size.
Because Text (Book / Offset) papers and Cover (Cardstock) papers use parent sheets of vastly different surface areas, an 80 lb Cover brochure stock is nearly twice as heavy and thick as an 80 lb Text brochure stock:
- US Text / Book / Offset Parent Sheet (
25 × 38 in=950 sq in=0.6129 m²per sheet):GSM = Basis Weight (lb Text) × 1.4805 - US Cover / Cardstock Parent Sheet (
20 × 26 in=520 sq in=0.3355 m²per sheet):GSM = Basis Weight (lb Cover) × 2.7048
Worked Example 2: Converting 80 lb Text vs. 80 lb Cover to GSM and Caliper
Suppose a brand manager requests quotes for a tri-fold brochure and compares an 80 lb Text option against an 80 lb Cover option:
- 80 lb Text Conversion:
GSM = 80 × 1.4805 = 118.44 g/m²(equivalent to standard European115–120 gsmcoated leaflet paper, with a caliper thickness of roughly3.8–4.2 ptor0.097–0.107 mm). - 80 lb Cover Conversion:
GSM = 80 × 2.7048 = 216.38 g/m²(equivalent to European215–220 gsmlight cardstock, with a caliper thickness of8.5–9.5 ptor0.216–0.241 mm). - Ratio Check:
216.38 / 118.44 = 1.8269(950 sq in / 520 sq in = 1.8269). Ordering80 lb Coverinstead of80 lb Textincreases substrate mass by82.7%and pushes the job past the170 gsmmechanical creasing threshold.
Use this prepress specification matrix to match brochure paper weight gsm, US basis weight, caliper thickness, and surface finish to your fold architecture:
GSM Tier (g/m²) |
US Basis Weight Equivalent | Typical Caliper (pt / mm / µm) |
Standard Finishes | Mechanical Scoring Requirement | Primary Brochure & Collateral Use Case |
|---|---|---|---|---|---|
| 115–130 gsm | 80 lb Text (118.4 gsm) to 85 lb Text (125.8 gsm) |
3.8–4.5 pt (0.097–0.114 mm / 97–114 µm) |
Coated Gloss, Silk/Satin, Uncoated Offset | None required; folds cleanly on high-speed buckle folders | High-volume rack brochures, box-insert instruction sheets, direct-mail self-mailers |
| 148–170 gsm | 100 lb Text (148.1 gsm) to 65 lb Cover (175.8 gsm) |
5.0–6.5 pt (0.127–0.165 mm / 127–165 µm) |
Coated Silk/Matte, Gloss Art, Uncoated Smooth | Threshold Zone (>= 170 gsm): Channel score recommended on coated stocks or dark spine ink |
Standard corporate Tri-Fold, Z-Fold, and 4-Panel Roll-Fold brochures (high opacity, zero show-through) |
| 200–250 gsm | 80 lb Cover (216.4 gsm) to 90 lb Cover (243.4 gsm) |
8.5–10.5 pt (0.216–0.267 mm / 216–267 µm) |
Matte/Silk Coated, Soft-Touch Laminated, Uncoated | Mandatory platen or rotary matrix channel crease prior to folding | Flagship Single/Double Gate-Fold reveals, architectural & real-estate lookbooks, B2B leave-behinds |
| 270–350 gsm | 100 lb Cover (270.5 gsm) to 130 lb Cover (351.6 gsm) |
11.0–16.0 pt (0.279–0.406 mm / 279–406 µm) |
Heavy Cover Cardstock, Spot UV, Foil, Laminated | Mandatory platen die-score (W_channel >= 1.1 mm) + wider 2.5–3.0 mm panel step-down |
Presentation pocket folders, rigid Bifold covers, self-standing counter display brochures |
When specifying specialty tactile papers or switching between coated silk and uncoated offset stocks, always request a wet or digital press proof on the exact production caliper; our guide to evaluating substrate proofs on UPM Asendo 80 outlines the physical verification checks to run before authorizing the full press run.
Takeaway: Specify 148–170 gsm (100 lb Text) as the default workhorse for multi-panel Tri-Fold and Z-Fold brochures, step down to 115–130 gsm (80 lb Text) when mailing weight or 8-panel roll bulk is constrained, and reserve 200–300 gsm (80–110 lb Cover) for scored Bifold or Gate-Fold pieces.
Creasing Physics, Grain Direction & Prepress Bleed Tolerances
Even when panel widths are mathematically exact, heavy brochures (>= 170 gsm) will crack along the folded spine if the finisher skips channel creasing, folds across the paper grain, or lays excessive CMYK toner/ink across the hinge.
1. Why >= 170 gsm Brochures Crack & How CITO Matrix Creasing Works
Coated printing papers achieve their smooth, high-gamut surface by calendaring a mineral coating (kaolin clay and calcium carbonate) over shorter cellulose wood fibers. On digital toner presses, fused polymer toner forms an additional rigid plastic film across the surface. When a sheet at or above 170 gsm is forced through steel buckle-folder rollers without pre-creasing, the outer radius of the 180° fold experiences high tensile strain while the inner radius buckles under compression. The brittle mineral coating and ink layer fracture, exposing a jagged white line of raw paper fibers along the dark spine (spine cracking).
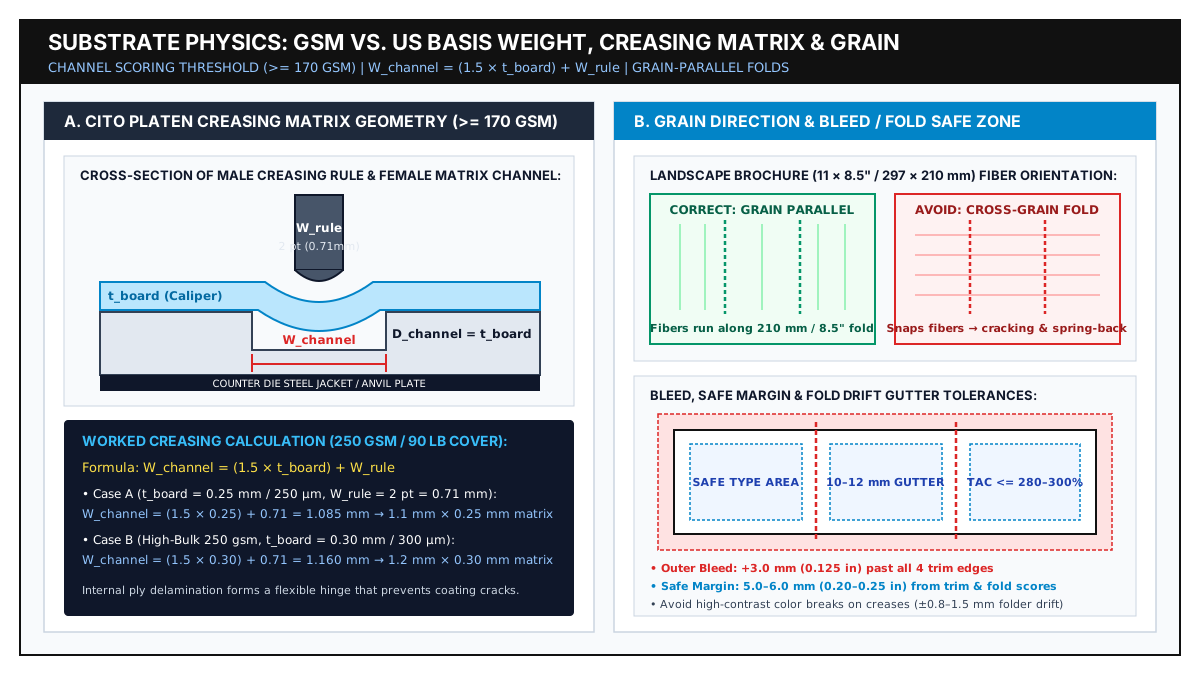
Note that rotary circular scoring wheels on a folding machine merely crush or partially slice surface fibers. For 170–350 gsm brochures, specify platen or cylinder matrix channel creasing (where a blunt rounded steel creasing rule presses the sheet into a precision female matrix channel). This action gently delaminates the internal fiber plies along the fold line without breaking the outer surface coating, forming a compliant hinge Bead.
Per the CITO Abacus creasing matrix specification, size the female matrix channel width (W_channel) and channel depth (D_channel) from the paper’s measured caliper thickness (t_board) and the male creasing rule thickness (W_rule, typically 2 pt = 0.71 mm for 170–300 gsm commercial print):
- Creasing Channel Width:
Wchannel = (1.5 × tboard) + Wrule - Creasing Channel Depth:
Dchannel = tboard(increased by+0.05 mmif the stock is laminated)
Worked Example 3: Sizing a CITO Creasing Matrix for a 250 gsm Coated Brochure
Suppose your print shop is finishing a luxury Gate-Fold brochure on 250 gsm (90 lb Cover) silk coated stock using a standard 2 pt (0.71 mm) creasing rule:
- Standard Coated Silk Stock (
t_board = 0.25 mm/250 µm/9.8 pt):Wchannel = (1.5 × 0.25 mm) + 0.71 mm = 0.375 + 0.71 = 1.085 mm→ Select a1.1 mmchannel width.Dchannel = 0.25 mm→ Select a0.25 mm(or0.30 mm) channel depth (e.g., CITO0.3 × 1.1 mmmatrix).
- High-Bulk Uncoated or Matte-Laminated
250 gsmStock (t_board = 0.30 mm/300 µm/11.8 pt):Wchannel = (1.5 × 0.30 mm) + 0.71 mm = 0.45 + 0.71 = 1.160 mm→ Select a1.2 mmchannel width and0.30 mmchannel depth (CITO0.3 × 1.2 mmmatrix).
2. Paper Grain Direction on Landscape 11 × 8.5 in and 297 × 210 mm Sheets
During papermaking on a Fourdrinier wire, cellulose fibers align parallel to the moving web. Folding parallel to the grain (with the grain) allows the fold crease to nest neatly between adjacent cellulose fibers. Folding perpendicular to the grain (cross-grain) snaps thousands of fibers across their axis, doubling folding resistance, causing rough irregular creases, and creating spring-back (where a closed tri-fold pops open on a counter instead of lying flat).
Watch out for a classic landscape imposition trap:
- Standard Tri-Fold and Z-Fold brochures are laid out in Landscape orientation (
11.0 inwide ×8.5 inhigh for US Letter;297 mmwide ×210 mmhigh for ISO A4). - The vertical fold lines run parallel to the
8.5 in(210 mm) short dimension. - Therefore, a cut sheet of
11 × 8.5 inor297 × 210 mmpaper must be Grain-Short (8.5 × 11 in/210 × 297 mmfiber alignment along the8.5 in/210 mmedge)—or imposed on an oversized parent press sheet (19 × 25 in,23 × 35 in, orSRA3 320 × 450 mm) so the210 mm/8.5 inbrochure spine runs parallel to the parent sheet’s grain axis.
3. Ink Coverage (TAC), Bleed, Safe Margins & Crossover Tolerances
Complete your prepress file check against these four production tolerances before exporting a PDF/X-1a or PDF/X-4 handoff file:
- Full Outer Bleed (
3.0 mm/0.125 in): Extend all background fills, photography, and die-line rules3.0 mm(1/8 in) past all four outer trim edges of the flat spread (producing a303 × 216 mmbleed box for A4 or11.25 × 8.75 infor US Letter). These tolerances mirror the US and EU bleed specifications for business cards and Adobe’s print bleed setup guidelines. - Fold-Line Safe Zones (
5.0–6.0 mm/0.20–0.25 inper side): Keep all body copy, prices, QR codes, and logos at least5.0 mm(3/16 into1/4 in) inside outer trim lines AND at least5.0 mmaway from both sides of every fold score. This creates a10.0 to 12.0 mm(0.40–0.50 in) total clear gutter across every crease. - Avoid High-Contrast Color Breaks Directly on Fold Scores: Mechanical buckle folders exhibit a
±0.8 to 1.5 mm(1/32 to 1/16 in) sheet-to-sheet folding drift. If a dark navy panel meets a stark white panel exactly on the97.0 mmor197.0 mmfold line, a1.0 mmfolder shift wraps a visible stripe of navy onto the adjacent white panel edge. Either carry a continuous background across the fold or step the color break intentionally inside one panel as a deliberate graphic frame. - Control Total Area Coverage (TAC) & Coatings Over Folds: Heavy four-color builds saturate paper fibers and embrittle the surface layer. When designing dark brochure covers, verify your CMYK vs RGB profile conversion and apply our rich black vs registration black separation rules to cap Total Area Coverage (
TAC) at or below280–300%across fold hinges. If your brochure uses high-gloss UV varnish or in-line metallic coatings, ask the prepress operator to knock out a1.5–2.0 mmcoating-free strip along the crease line or switch to flexible aqueous satin/matte lamination so the finish does not shatter when folded.
When handing off native layout files to a print partner or another designer, bundle the custom ruler guides, ICC profiles, linked high-resolution assets, and fonts using our InDesign package and print handoff checklist.
Takeaway: Require platen channel creasing (W_channel = 1.5 × t_board + W_rule) on all coated stocks >= 170 gsm, verify that paper grain runs parallel to the 8.5 in (210 mm) vertical fold spine, maintain a 5.0 mm safe zone on both sides of every crease, and cap CMYK ink coverage at <= 280–300% over fold lines.
Prepress Handoff Checklist for Multi-Panel Brochures
Run this eight-point verification table on your layout file and exported press PDF before releasing a brochure job to production:
| Prepress Check Item | Target Specification | Verification Method |
|---|---|---|
| 1. Flat Trim & Bleed Box | US Letter: 11.0 × 8.5 in (11.25 × 8.75 in w/ bleed); ISO A4: 297 × 210 mm (303 × 216 mm w/ bleed) |
Inspect Document Setup and exported PDF TrimBox / BleedBox in Acrobat Output Preview |
| 2. Fold Score Coordinates | Tri-Fold Outside: 3.625 / 7.3125 in (97 / 197 mm); Inside: 3.6875 / 7.375 in (100 / 200 mm). Z-Fold: equal 3.6667 in (99 mm) |
Confirm custom vertical guides on both Page 1 and Page 2; place non-printing fold marks in the slug area |
| 3. Multi-Panel Nesting Clearance | Roll Fold: 1.5–2.5 mm (1/16 in) progressive step-down per inner panel; Gate Fold: 1.0–2.0 mm (1/16 in) center seam gap |
Fold an unscaled Actual Size duplex mockup on target caliper stock and check for flat closure |
| 4. Trim & Fold Safe Margins | Minimum 5.0 mm (0.20 in) clear of outer trim; 5.0 mm clear on each side of every fold score (10.0 mm total crease gutter) |
Toggle guide visibility (W in InDesign) and confirm zero text frames or QR codes cross safety guides |
| 5. Crossover Alignment & Color Breaks | Zero high-contrast vertical color splits stopping exactly on a fold score (±0.8–1.5 mm folder drift allowance) |
Shift a test guide ±1.5 mm left/right of each score line to verify no unintended color wrap appears |
| 6. Substrate GSM & Grain Orientation | 115–130 gsm (mailers), 148–170 gsm (standard tri-fold), 200–300 gsm (covers/gate folds); Grain parallel to 8.5 in / 210 mm spine |
Confirm Grain-Short cut sheet or grain-parallel parent sheet imposition in the printer’s written estimate |
| 7. Channel Creasing Specification | Mandatory platen/cylinder matrix channel crease for all coated/digital stocks >= 170 gsm (W_channel = 1.5 × t_board + W_rule) |
Confirm matrix channel scoring (not rotary knife scoring) on the bindery work order for >= 170 gsm jobs |
| 8. CMYK Separations & Spine TAC | Output intent matches printer ICC profile; TAC <= 280–300% over fold lines; zero Registration swatch on artwork |
Run Acrobat Pro Output Preview → Separations with Total Area Coverage warning set to 280% |
Explore more production guides in Print Design, or follow the links below to complete your file preparation and proofing workflow:
- Brochure Design Software and Cost: What to Choose — Compare page layout applications and itemize brochure design quotes by scope and file handoff.
- How to Print a Trifold Brochure Back to Back: Test the Fold First — Run a single-sheet duplex orientation and
Actual Sizefold check before printing a batch. - Package an InDesign File with Links and Fonts: Handoff Checklist — Deliver native multi-panel spreads, custom fold guides, fonts, and reference PDFs cleanly.
- CMYK vs RGB for Print: A Handoff Decision Sheet — Confirm who converts color spaces and which ICC profile your exported PDF must carry.